 Free shipping for all U.S. orders over $100


Last Updated: November 1, 2026
Quick Summary
To install a new wood stove door handle, let the stove cool completely, then thread the rod into the door casting and stack the flat washer, spring, wooden grip, and nut in that order. Tighten the nut snug by hand plus no more than a quarter turn with a wrench, then check clearance and latch engagement before firing.
- Diagnosing a wood stove door handle takes about five minutes with no tools beyond your eyes and hands.
- Most spring and threaded handles fit a 3/8-inch rod, but 5/16-inch and 1/2-inch rods exist.
- Removing the old handle takes about ten minutes once the stove is cold.
- Lubricate a wooden grip's inside with bar soap and twist it on off the stove for an easier fit.
- Open and close the door ten times after installation and recheck the nut, since heat and use loosen a stack.
Table of Contents
- Diagnosing a Loose, Stuck, or Misaligned Wood Stove Door Handle
- Identifying Your Handle Type and Attachment Method Before You Buy
- Tools, Materials, and a Wood Stove Door Handle Replacement Kit
- Step-by-Step: Removing the Old Handle Safely
- Wood Stove Spring Handle Installation and Threaded Rod Fit
- How to Adjust Wood Stove Door Tension and Latch Engagement
- Wood Stove Door Gasket Replacement and Seal Checks
- Order the Right Replacement Handle for Your Stove
- Frequently Asked Questions
Diagnosing a Loose, Stuck, or Misaligned Wood Stove Door Handle
A wobbly handle is usually a worn fastener or a stripped wooden grip, not a broken door. Before you order anything, figure out which part actually failed.
Diagnosing a wood stove door handle takes about five minutes and no tools beyond your eyes and hands.
Start with a simple test. Open the door, then wiggle the handle where it meets the door frame. Watch for movement in three places:
- The grip itself spins or slides but the shaft stays still
- The shaft moves loosely inside the door casting
- The whole door sags or drags against the stove body
Each points to a different fix. A spinning grip means the wood or spring has worn.
When the Problem Is the Handle, and When It Isn't
A common pattern is that many "handle problems" are actually door problems. If your handle feels stiff or won't latch, check the door seal first. A flattened gasket pushes the door out of alignment, and no new handle will fix that.
The handle is the culprit when:
- The grip is cracked, charred, or missing
- The handle wobbles but the latch still catches
- The threaded end is stripped or snapped
Look elsewhere when:
- The door won't close flush against the stove body
- You smell smoke or see gaps around the door edge
- The latch catches but the door still feels loose
Watch out: replacing a handle when the real issue is a worn gasket wastes money and leaves the safety problem in place.
Identifying Your Handle Type and Attachment Method Before You Buy
The fastest way to get the right part is to identify your handle type and stove model before you order. If you are deciding between genuine OEM and aftermarket handles, this OEM vs Aftermarket Fireplace Parts guide explains the tradeoffs before you buy.
Coiled spring handles slide over a threaded rod and grip by friction. Many people add a wooden grip over the spring for heat protection.
Threaded wooden handles screw directly onto a threaded shaft. Part #89520, for example, twists onto the existing shaft on select Ashley, US Stove, and Vogelzang furnaces.
Bolt-on handles mount through a hole in the door casting with a nut and washer.
Find Your Model and Serial Plate First
Before you measure anything, locate the data plate, a metal tag on the back of the unit, inside the firebox side wall, or under the ash lip. It lists the manufacturer, model number, and serial number. Photograph it with your phone; older plates are often painted over.
With the model number in hand, match the part three ways, in this order:
- Manufacturer parts list. Search the model number plus "door handle" or "handle assembly" on the manufacturer's site or a dealer parts diagram, which shows every washer, rod, and nut in the stack.
- Part number cross-reference. If the original part number is stamped on the handle or in your manual, search it directly; aftermarket sellers often list the OEM number they replace.
- Physical measurement. If no part number survives, measure the old handle and rod (below) and match those dimensions to the listing.
Measure the Three Dimensions That Matter
Measure these before ordering, and write them down:
- Rod diameter. Most spring and threaded handles fit a 3/8-inch rod, but 5/16-inch and 1/2-inch rods exist. Measure across the threaded rod with calipers or compare it to a drill bit that fits the threads.
- Mounting hole spacing, center to center. For bolt-on handles, measure from the center of one mounting hole to the other. Buck's 4¼" spacing is one example; do not assume yours matches.
- Overall handle length and grip diameter. A longer handle gives more leverage but can foul the stove body or a heat shield when the door swings.
Also note the thread pitch if you can. A coarse thread and a fine thread of the same diameter will not interchange, and forcing a mismatched nut strips the rod.
Match the Whole Stack, Not Just the Grip
A handle is a stack: grip, spring or wood core, threaded rod, flat washer, lock washer, and nut. Replacing only the grip on a worn rod leaves the wobble in place. Confirm whether the listing includes the rod and fasteners or the grip alone; if the rod threads are flattened or the nut spins freely, order the full assembly.
Tools, Materials, and a Wood Stove Door Handle Replacement Kit
A wood stove door handle replacement kit needs only basic tools. You probably own most of them already.
Gather these before you start:
- Adjustable wrench or the correct socket size
- Pliers, ideally needle-nose
- Penetrating oil for rusted fasteners
Safety prep matters more than the tools. Let the stove cool completely before you touch anything, a stove that burned this morning can still hold heat for hours.
One insider tip: photograph the handle assembly before you take it apart. Reassembly gets confusing fast when you're holding a spring, a rod, and two washers with no reference.
Step-by-Step: Removing the Old Handle Safely
Removing the old handle takes about ten minutes once the stove is cold. Keep every small part in a cup so nothing gets lost.
- Confirm the stove is cold. No embers, no warmth on the door.
- Apply penetrating oil to the threaded end and nut. Let it sit for a few minutes on rusted parts.
- Hold the shaft steady with pliers so it doesn't spin inside the door.
- Turn the nut or handle counterclockwise with your wrench.
- Slide the handle off the threaded rod once it's loose.
- Inspect the rod and mounting hole for stripped threads or cracks.
- Clean the threads with a wire brush before installing the new part.
Watch out: a seized fastener that you force can crack the door casting. If it truly won't move, stop and let the oil work longer.
Wood Stove Spring Handle Installation and Threaded Rod Fit
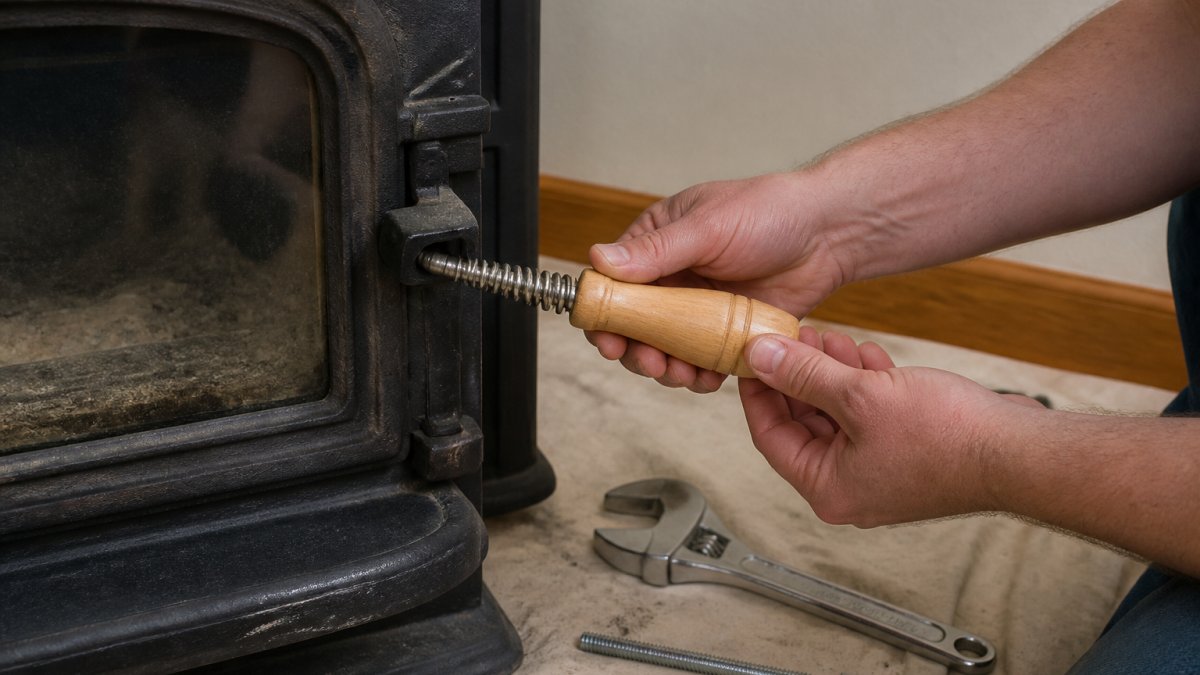
Hands sliding a wooden grip onto a coiled spring door handle of a black cast iron wood stove with tools nearby
Wood stove spring handle installation comes down to one thing: a snug fit on the threaded rod with the correct hardware stack behind it. A loose spring spins and won't grip. A cross-threaded one never seats right.
Confirm the Rod and Thread Match Before Assembly
Start by checking the rod diameter, most spring handles fit a 3/8-inch threaded rod, but confirm yours. Then check the thread pitch: thread the nut that came with the new handle onto the rod by hand.
Inspect the rod while the handle is off. Look for flattened threads, a bent shaft, or cracks where the rod enters the door casting.
Assemble the Stack in the Right Order
Install from the door outward, in this order:
- Threaded rod seated fully into the door casting.
- Flat washer against the door face to spread load and protect the casting.
- Spring threaded onto the rod by hand until it seats.
- Wooden grip slid over the spring, if your design uses one.
- Flat washer and nut at the end to lock the stack.
For a wooden grip that slides over the spring, lubricate the inside with bar soap. Twist it on off the stove for an easier fit, then reinstall.
Tighten the nut until snug, not cranked down. Over-tightening crushes the spring, splits wooden grips, and can strip the rod threads. Tighten by hand, then give the wrench no more than a quarter turn past finger-tight.
Check Clearance and Operation Before You Fire the Stove
With the handle installed, open and close the door through its full swing. Watch for three things:
- Clearance. The grip should not contact the stove body, a heat shield, or the floor when the door opens fully.
- Latch engagement. The latch should catch fully on the strike, not just on the tip. If it barely grabs, adjust per the tension section below.
- Grip security. Twist the grip by hand. It should not spin on the spring or slide along the rod.
Functional Test After Installation
Before you build a fire, run these checks:
- Close the door slowly and confirm it seats flush against the stove body with no gap at the top, bottom, or sides.
- Run the dollar-bill test around the full door edge. The bill should pull out with light resistance at every point; a section that slides out freely means the gasket or latch needs attention.
- Open and close the door ten times and recheck the nut, heat and repeated use loosen a stack.
- Check the latch strike for wear. A grooved or rounded strike will let a new handle feel loose even when it is tight.
After any handle or latch work, always recheck the seal contact. A handle that closes perfectly still leaks if the gasket is shot.
How to Adjust Wood Stove Door Tension and Latch Engagement
Knowing how to adjust wood stove door tension keeps the door sealing tight season after season.
Check latch engagement first. Close the door slowly and watch where the latch meets the strike. It should catch fully, not just on the tip.
To adjust:
- Loosen the handle nut slightly to reposition the latch arm
- Rotate the handle a quarter turn to change where the latch sits
- Retighten and test the close before making another change
Then test the seal. Close the door on a dollar bill and try to pull it out. If it slides out easily, the door is too loose.
Wood Stove Door Gasket Replacement and Seal Checks
A wood stove door gasket replacement is often the real fix behind a "loose handle" complaint.
Test the gasket with the dollar-bill trick from the last section. Run it around the whole door edge, not just one spot.
If the gasket is flattened, cracked, or crumbling, replace it. Follow this step-by-step guide to replacing a wood stove door seal to install the new gasket correctly.
After any handle or latch work, always recheck the seal contact. A handle that closes perfectly still leaks if the gasket is shot.
Order the Right Replacement Handle for Your Stove
Matching the part to your stove model is the last step, and the one that saves the most returns.
Total Hearth offers replacement handles for several stove brands. Match the part to your model before you order:
Handle |
Fits |
Price |
|---|---|---|
Vermont Castings 1600663 Wooden Ash Door Handle |
Defiant, Encore, Resolute Acclaim models |
$9.88 |
Buck Stove Black Door Handle |
Select Buck stoves, 4¼" hole spacing |
$19.99 |
Buck Stove Wood Handles, Set of 2 |
Fits over small spring handles |
$29.99 |
Round Hardwood Grip, Part #89520 |
Ashley, US Stove, Vogelzang furnaces |
$7.99 |
Verify your model number before ordering. The Vermont Castings 1600663 wooden ash door handle is listed for specific Defiant, Encore, and Resolute Acclaim models, so check the list. If you own a Buck Stove and have measured your 4¼" mounting hole spacing, the black door handle is a direct match. For Ashley, US Stove, or Vogelzang owners, the round hardwood grip handle screws onto the existing threaded shaft.


Still unsure? Our team provides expert technical guidance to help you match a part to your stove model before you order.
Getting the wrong handle wastes a week of cold nights, and guessing at fit is the fastest way to end up with a part that won't work.
Frequently Asked Questions
Are wood stove door handles universal?
No. Handles differ in thread size, rod diameter, mounting hole spacing, and latch design, so a handle that fits one stove will not fit another. A Buck Stove handle, for example, uses 4 1/4-inch center-to-center mounting hole spacing, while a Vermont Castings 1600663 wooden ash door handle only fits specific Defiant, Encore, and Resolute Acclaim models. Measure your existing handle and confirm the OEM part number against your owner's manual before ordering.
How tight should a wood stove door handle be?
Tight enough that the latch pulls the door firmly against the gasket, but not so tight that you have to force the handle or the door flexes. After installing a new wood stove door handle, close the door and check that the latch engages fully without slack. If the handle spins loosely or the door rattles, adjust the latch or striker rather than overtightening the handle itself, which can strip the threaded end.
How do you remove a stuck wood stove door handle?
Let the stove cool completely first, then apply penetrating oil to the threaded end and wait 15 to 30 minutes. Hold the door steady and turn the handle counterclockwise with a firm grip; if it will not budge, use locking pliers wrapped in cloth to protect the finish. Never heat the handle with a torch while it is attached to the stove, and never pry against the door frame, which can bend the latch mechanism.
How can you tell if a wood stove door is sealing properly?
Run the dollar bill test: close the door on a dollar bill at several points around the perimeter and pull gently. The bill should drag with resistance at every point. If it slides out easily, the gasket is worn or the door tension is too loose. A wood stove door gasket replacement or a latch adjustment usually fixes it, and a proper seal keeps burn temperatures stable and prevents smoke from leaking into the room.
